Samsung Galaxy Tab may come with retina display

Posted by Unknown Rabu, 28 Desember 2011 0 komentar

The new Samsung tablet is believed to have 11.6-inch screen, with a 2,560 x 1,600 resolution.

Samsung is preparing to unveil a new Galaxy Tab with retina display, which is regarded as the best so far. A website, quoting its sources, said that this will be an 11.6 inch tablet with Android 4.0 Ice Cream Sandwich operating system running underneath.

Retina display is known for its high pixel density due to which the human eye is unable to distinguish individual pixels. Technically speaking, if the display produces images in about 300 pixels per inch, then it is known as retina display. At this pixel density, images look sharp on the display.
Retina Display currently is available on iPhone 4 where images are seen in 960x640-pixel resolution. The phone is available for Rs 34,000 in India. The next tablet from Apple, iPad 3 will also have retina display in them.
The new Samsung tablet is believed to have an 11.6 inch screen, with a 2,560 x 1,600 resolution, almost equal to retina display. It's also believed to come with 2GHz dual-core Exynos 5250 CPU and a 16:10 aspect ratio. The device is said to have a "special wireless docking mode" which will allow the users to enjoy gaming on HDTVs.

Baca Selengkapnya ....

Unlocking your Google Nexus with a Smile

Posted by Unknown Minggu, 18 Desember 2011 0 komentar
Put a smile on your face! Even if you don't want to, you might want to smile because you need to unlock your phone. Haha...a weird and a fun feature that will be available on the new Samsung Galaxy Nexus. No Password and now Swipe

Baca Selengkapnya ....

Top 5 iOS apps which work like paper

Posted by Unknown Senin, 05 Desember 2011 0 komentar

Some apps in the list are paid, but they come with free alternatives as well.

The iTunes app store has numerous notebook apps, which is very much evident when users search for the keyword "note" in the iOS app store search box. Since there are so many, one has to be very careful while choosing one. While some of these are paid, their alternative free versions are also available.

You can use these iOS apps as a replacement of paper.

Agendas (Rs 500)
Most users who have mountains of documents on their desk may use Agendas on their iPad to create interactive meeting agendas. You can then broadcast these to other iPads over WiFi network.


The best part with iPad is, users can get feedback from others which make sure the two way communication is complete.

OneNote (Free)
Those who intend to use OneNote need a Windows Live account to work on it. It shows notes in a list just like a phone directory.
With OneNote Mobile, you can create searchable notes with text, pictures, bullets, and checkboxes. Then keep your notes in sync using free Windows Live SkyDrive cloud storage to access, edit and manage them from virtually anywhere, from your PC or almost any web browser.
Currently, users cannot create notes on iOS devices using this app. We may expect such options in future.

Card Flick (Free)
Exchanging cards is something we need to do regularly, but it is always helpful if users can exchange digital business cards with their business contacts, and the iOS app - Card Flick, does just that.
Using Card Flick, you can create a new card through the My Card tab. Users can start by choosing a theme, and then customize it as per their needs. Every business card will have a photo, name, position and company name. Other additional details which may be included are phone number, email, website, and tagline.

Sketchbook Pro (Rs 250)
The app Sketchbook Pro is good for those who are not designers but they want to draw. However, users may need some time to become familiar with the controls of the app.

Oxford Dictionary (Rs 1,500)

It has a clean interface with word list on the left. Users can either scroll through words or can just tap on the letters needed to get to the relevant word quickly.

On the right side, there is a section where users can see the definitions and examples of how the words are used are displayed. This section can also be resized as per requirement. From the top menu, users can access the history of their word searches, favourites and back and forth navigation arrows which take the users between words recently searched.

Baca Selengkapnya ....

Intel Atom based smartphones coming next year

Posted by Unknown 0 komentar

Intel, a chip maker has already tied-up with Google for Android based smartphones based on Atom processors.

Intel, world's largest chip maker, plans to bring smartphones based on its Atom processors. The smartphones will be based on Android operating system and Atom processor.
Speaking at the Intel cloud summit, R Ravichandran who is Intel's India and South Asia sales director, said, "Google TV, which uses Intel processors has already debuted. So are Ultrabooks and tablets with Intel processors. Next year, you will see smartphones with Atom cores make their debut,"
Atom based tablets are already available with as many as 35 companies were using the new platform in the first half of 2011 or later. Intel has already said that the devices wouldn't just be limited to Windows 7 or Intel's own MeeGo (Now dead) and would use Android as well.

Intel had announced the availability of its first Atom processor designed for smartphones and tablets in mid-2010.
The chip, which was earlier known as Moorestown, is now called Z600. It provides average 4-5 hours of battery life for cellular browsing or video viewing but over 10 days of standby and about 2 days of audio.
The chipmaker had also claims much better performance than a typical smartphone, with about 1.5 to 3 times more raw computing power as well as a GMA 600 graphics core that supplies more visual details through OpenGL ES 2.0 and hardware video acceleration. It can record video at 720p and play it back at 1080p. Z600 also supports Hyper threading, which means that it behaves like two cores in certain cases. In burst mode, the chip very briefly spikes performance when needed.
To keep the footprint small, Intel is using a full system-on-a-chip with the graphics and most other components built in the chip itself.

Intel is providing different processors to the OEMs (Original equipment manufacturers) - chips up to 1.5 GHz for smartphones and 1.9 GHz for tablets.

Notably, today even Quad core chips are now available for smartphones. It will be interesting to see how Intel manages to compete as a late comer to the space.

Google has already released the Android version optimised for x86 architecture (which is suitable for intel's processors), which means that smartphones using Atom processors are not that far off.

Baca Selengkapnya ....

Australia AndroidLand

Posted by Unknown Sabtu, 03 Desember 2011 0 komentar
Telstra is the maker of the world first Android store, AndroidLand in Melbourne. It looks great for those who like to view all Android choice available in one store and see what it could do.

Baca Selengkapnya ....

How to Subtitle Your Videos

Posted by Unknown 0 komentar
Here's how you can add subtitles to your video files, plus links to some useful software...
So you remove your DVD remotes, put in City of God DivX CD that you have illegally downloaded/ripped, and voila! No subtitles. You won’t understand even the swear words, so what’s the point? In India, we make movies in a zillion languages, yet good films are few and far between. We also have homegrown videos, where intelligibility of speech and vision is a debatable issue. So subtitles are a part of your DVD architecture that can make life a lot easier.

No worries, here are some tips for retrieving subtitles from the net, adding your own subs, changing their colour etc. I've added pointers on how to resync your subtitles if they go out of sync, as that also happens a lot, yielding funny lip movements. On a frank and serious note, these issues never arise in an original DVD or official download, and it actually is less stressful watching good ol’ box packs. But for anti-DRM folks out there, there's more...
Resources for Subtitles
The first and best way to get your subtitles is to rip it out of the DVD. Let's run through the process. There are quite a few methods and softwares that do it, but I go by the following process. First get yourself VobSub from here. This is a free subtitle filtering utility that works on the Directshow environment. The files associated with it are .sub and .idx. There are other types of subtitle files; we will encounter them as we go along. VobSub is important as it is anyway needed to play subtitles for any AVI file in software media players, provided the .sub and .idx file are in the same directory as the movie, and with the same name.
Another option is to get SubRip from here. This essentially creates text files though the .srt extension. To create your own subtitles, the best software is a spanking new one called Aegisub, so grab it here. There used to be the famous Substation Alpha software, which is not being updated anymore, though it deserves a mention in any subtitle article. The file type it generates is .ssa (again a text), and the mentioned Aegisub supports it. Further, .srt files and many others are also supported. The last, and easiest, thing you can do is download .srt or .sub files from the Internet.

Adding Subtitles
There are two types of 'subbing': hard and soft. Which do you need? Wait, before that, what do they mean? Hard subbing means permanently adding the subs to your video (it will be in the pixels), whereas soft subbing lets you view the video with separate subtitles files being called by the codec, mainly in MPEG 4 part 2 and part 10 file types like DivX, Xvid, and H.264. But, if your DVD player doesn’t support DivX and you have only a VCD option, hard subbing is mandatory. Soft subbing is actually a misnomer; you have to just download the subtitle file, install Vobsub, place the file in the same directory, and watch the clip on something as generic as Windows Media Player. Don’t forget to rename the file to the movie’s name. Even if you create your own subs with Aegisub, you can export and save as normal .sub or .srt subtitle files and view them. Aegisub can be used to do timing and resynching edits, adjust frames per title, adjust colors of the subtitle, and every other small whim. The learning curve is quite flat, too.
Hard subbing
This is the fun and involving part, though not that tough to execute. I use VirtualDub; you can get it here. It's probably the best AVI tool available. Install VirtualDub with all the plugin options; you are required to do this in the option provided while installation wizard. The main file we will need is actually from VobSub installation, namely called text sub, and it shows up as an option while running the wizard.

Once this is done, it's very easy. All you need is the sub file (placed in a folder you can remember). Then open VirtualDub, get in your video, go to filter (Ctrl+F), and add the text sub-filter. The plugin will open and ask for the subtitle file (.srt), so browse and locate it. That’s all. Preview once and render. It could take a while.

Baca Selengkapnya ....

How to: Remotely access your PC with a smartphone

Posted by Unknown Kamis, 01 Desember 2011 0 komentar
This simple workshop will show you how you can access your PC at home or office from anywhere in the world via an Android phone or tablet, iPhone or iPad.

There may have been several occasions when you are at home, on a holiday or travelling and urgently need to access your office PC for some important document you forgot to take with you. What do you do? How do you gain access to your PC?

Well, there is a way to gain access to your PC via the Internet using the Remote Desktop Protocol or RDP. But this involves setting up a live IP address, which is visible all around the world. You can possibly do this for home, but what about your office PC, which is behind a firewall or a proxy server? You would not be able to gain access as easily. In this workshop, we shall show you how simple it is to gain access to your PC at home or office from your Android smartphone or tablet as well as the iPhone or the iPad. All you need is an internet-enabled device with a free-to-use app called TeamViewer. Configuring TeamViewer is easy and you can get it working in a matter of minutes. At the same time, the utility is safe and secure. Once you have your setup working, you can also connect to your desktop PC from any Internet cybercafé using the Web login.

Download and install TeamViewer

TeamViewer is an all-in-one solution for remote access over the Internet. It is free for personal use and is compatible with desktop operating systems such as Windows, Mac, Linux and also with mobile operating systems such as Android and iOS. Download TeamViewer for your desktop PC from www.teamviewer.com. We recommend the portable version which can be run from a USB drive or a CD. The app for the smartphone and tablets can be downloaded from their respective online app stores.
 Once downloaded, you'll have to configure it at both ends once, but before you do this, you might need to register with TeamViewer for a free user account. You can do so by signing up at https://login.teamviewer.com/ and creating a free account.


The Desktop PC Configuration
Start TeamViewer and proceed with the installation as you would usually do with any other software. Once the installation is done, start TeamViewer and it will sync with its online servers and allocate a unique ID and password for your computer. Note down these details and keep them safe. Every time you restart the application, you will receive a new password, while the ID will remain static for your PC. This ID and password is a one-time security pass to give the invitation for a remote login to your PC. You can use this ID and password to connect to your desktop PC from a remote location. But if you restart your PC very often, it will be difficult to keep track of the changing passwords. For this reason, you need to set up an unattended access to TeamViewer. Click on ‘Connection’ and then on ‘Setup unattended access’. This will bring up a wizard wherein details such as the PC name and password needs to be specified. Give the desktop PC a name and password of your choice. The next screen will then ask you to enter the details that you registered online. If you did not do it earlier, you can create one now too. After entering the details, your system will now be available to you online with the same password every time. Your desktop PC is now available for remote access. You can now choose to lock the desktop or turn off the monitor.
After starting the TeamViewer app on the smartphone or tablet, enter the login details, connect to the partner and gain remote access within minutes.

The Client Side
After installing TeamViewer on your phone, start the app. You will be welcomed by an initial introduction screen, which can be skipped by pressing the back button. The next screen will be ready on the ‘Connection’ tab, where you can type in the details of the ID and the password of the computer you would like to connect to. Simply skip this and click on the ‘Partner list’ tab. Here, you can log in using your username and password you created on the TeamViewer website. Once you do this, you will see a button called ‘My Partners’. Click on this button and you will now see the desktop PC available online. Click on the PC name and you can gain access to your desktop PC. And you’re done! Simple, isn’t it? Once you've logged in, you can try out a number of features that TeamViewer has to offer. You can change resolutions, switch monitors, tweak the performance by optimizing it for quality or speed, remove wallpapers for better speeds, disable remote cursor, use the keyboard, use the mouse right-clicks, enable function buttons, and the list goes on. So, enjoy your remote access. 

Baca Selengkapnya ....

Ho To: Run Android apps on Windows

Posted by Unknown 0 komentar
Most Android-based smartphone users would agree that they would prefer testing an app before downloading it to their phone.
Most Android-based smartphone users would agree that they would prefer testing an app before downloading it to their phone. The reason behind this is usually to avoid unnecessary space hogging apps. Some users might also wish to play some of the cool mobile games available for the Android platform on their PC i.e. on a larger display. In this tutorial, we’ll show you how can your favorite Android apps on your Windows-based PC using a simple and free software called BlueStacks.
BlueStacks is an app player for Windows, which can play Android apps faster than it can run on a phone and that too, on a full-screen. The app includes 10 pre-loaded apps and one can add up to 26 more apps of their choice. Favorite apps can be pushed directly from the phone onto the PC using an Android app via internet route. Download and install the software for Windows from the URL ‘www.bluestacks.com’. The software is nothing, but a simple virtual Android operating system, which simulates an Android phone or UI. It uses the desktop PC’s resources such as the processor, the internet connection, mouse, keyboard and the audio card. The installed folder located on the PC contains the necessary files for its use, namely the kernel, data, system, boot and storage (the SD card). The BlueStacks Android (Gingerbread) virtual machine creates a hardware environment with a limited amount of storage (around 363 MB) for installing apps and 262 MB of SD card storage space.

   Once BlueStacks is installed, the application will be running the Android operating system in the background and you will see an icon in the system tray area and a widget will be running on your screen. A single click on the widget will reveal the Android system apps installed in it. Click on the apps and enjoy them on a large screen. Additional apps can be installed from the BlueStacks website by signing in using your Facebook account details. To get to this page, all you need to do is click on the BlueStacks widget, scroll to and click on the app icon/shortcut ‘Get more apps’. A website will open up where you can login using your Facebook details. Once logged in, simply click on the ‘Subscribe’ button for the available apps (in the Featured Apps section) and they shall automatically get installed on your system via the internet. The ‘Could Connect’ link on the same page will highlight a special 9-pin numerical code which needs to be entered on your Android phone running the BlueStacks Cloud Connect app (download it from the Android Market for free). Once done, you can push apps from your phone to your PC by simply selecting multiple apps and syncing it. That’s it! You can now enjoy all your favorite apps from your phone on your Windows desktop PC.

Baca Selengkapnya ....

Tips and tricks for Android device owners

Posted by Unknown Rabu, 30 November 2011 0 komentar

New users may feel lost seeing numerous options on Android, thus completely miss out on the fun part of Android.

Today Android is considered as number one operating system. There are so many things the users can do with their Android based devices that are not possible in handsets with rival platforms. However, the vast number of applications and features some time lead to confusion among users especially the first timers.
Let's start by talking about the home screen customisation options available to the users. Most options do not require the users to jailbreak the phone and are applicable to almost any version of Android phones.
Whenever users need to add any widget to the home screen, they just need to hold their finger in open space and when the pop up menu comes up, they need to choose widgets. Users can use their home screen real estate to the maximum by making optimum use of the widgets. Also, users must sort out the best widgets for them.

Most users prefer to receive notification sound when they receive an email, and then there are other power users who don't want any sound. They can go to the settings menu of the Gmail and choose the silent option of ringtone. The new message alerts appear at the top of the screen which can be brought down to get the detailed view as well.

For every Android user, there are certain contacts they call frequently. Setting up one touch dialing for them is the best way to keep in touch with them all the time. For this users have to hold their finger on empty space and choose the option "Shortcuts".

Then comes the option "Direct Dial" and they can choose their contact from the contact list. If they want to send one touch SMS instead, they can choose the option "Direct Message" as well. Users can also bring their favourite sites to the home screen by simply long pressing the site in the bookmarks and then by choosing the option "Add Shortcut to home".

There are certain Android utilities which allow the users to browse through the phone just like computer. One such utility is Astro, which is a file management tool and allows the users to move and delete files as per their convenience. For cutting and pasting, users just need to long press on a text input field.
To open apps, users also have the option to set their own hotkeys. For this, they can go to main settings menu, choose applications and then select Quick Launch. If the on screen keyboard comes up at any point of time and the users don't want it, they can swipe the keyboard downward to make the keyboard vanish.

Baca Selengkapnya ....

Should you upgrade to iPhone 4S?

Posted by Unknown 0 komentar

A few basic reasons to be pondered upon before considering to buy the new iPhone 4S in India.

Apple quietly announced the much awaited iPhone 4S in India through Airtel and Aircel mobile operators. Several thousand jaws dropped. Not at the iPhone 4S but at its price — Rs 44,500 for 16 GB, Rs 50,900 for 32 GB and Rs 57,500 for 64 GB. Indeed, it is jaw-dropping for the slightly bumped improvements and a half-step upgrade to the existing iPhone 4. So if you already have an iPhone 3G, iPhone 3GS or iPhone 4, and are thinking of upgrading to an iPhone 4S, here are a few things to think about.
Design
iPhone 4S comes with the same design as the iPhone 4, . and has the same high-resolution 3.7 inch Retina display with 960 x 640 pixel resolution and 326 ppi density. There's no change in the physical design either. The device hasn't become slimmer or lighter. The lack of a bigger display was disappointing. It's likely that the display hasn't been increased in size because that would mean that developers would have to make their apps compatible with the new resolution.
However, rival are getting slimmer, lighter and sporting bigger displays with advanced panel technologies supporting highest possible resolution of up to 720p HD.

Hardware
Apple has packed a new dual-core A5 mobile processor, which was used in the iPad 2 tablet. Despite having a dual-core processor the phone has been clocked at 1 GHz and there is no mention of the significance of the second core. Although it does offer twice the computing muscle, not many applications can actually make the best of both cores. Apart from that, the graphics chip — PowerVR SGX543MP2 is currently top of the line and comes with two cores. The graphics chip does offer seven times more performance while playing games and also loads apps faster, though the RAM configuration remains unchanged.

The iPhone 4S comes with a dual-mode network which means it supports GSM as well as CDMA. Though Apple still hasn't joined the Near Field Communication bandwagon, the company has compensated that with a Bluetooth 4.0 chip which consumes much less power compared to its predecessors.
Apple has, in all fairness, packed an 8 megapixel camera that can record 1080p full HD video, and is a step higher than the iPhone 4's 5 megapixel snapper. The iPhone 4S has a front facing camera for Face-Time but it still isn't possible to make video calls over 3G. If one is looking just at the camera, then the smartphone is more expensive than a good quality DSLR camera.

The bottom line is that despite the new hardware promising better performance, the display isn't big enough to make the best of it. Meanwhile, the competition has dual-core processors with higher clock speeds with larger but poorer quality displays.

Software and services
Apple did give serious attention to the needs of its consumers by rolling out the iOS 5 update. The age old MobileMe service was revamped and launched as iCloud offering 5 GB of online storage. However, the issues related to iOS 5, such as the volume and the end call button acting weirdly, continue to exist. Even the popular virtual assistant service Siri is causing trouble for users outside the United States.
Technically, Siri is perfect except for its sentence formation and its bad phonetics that cause weird results. As of now the service is in beta, and Dan Kittlaus, the creator of Siri, recently left Apple. Besides that, ever since the iPhone 4S was released its software has suffered from several SIM failure issues that continue to exist.

Battery
Battery life has taken a massive hit with the iOS 5 update. Also, the standby time of iPhone 4S has come down to approximately 200 hours, compared to the 300 hours of standby time on iPhone 4, though talktime has been improved by one hour in the new edition. Sure the hour more of talking time over 3G networks is welcome but the standby time foresees massive fall.

Price
In a price-sensitive country such as India, several consumers consider the price of a smartphone before buying it. The all time high prices of iPhone 4S have left a number of existing iPhone 4S users wondering. Sure, the iPhone 4S does have more graphics punch, a full HD recording camera and a half-baked Siri assistant, but all that isn't worth more than Rs 10,000. Relative to the competition, iPhone 4S certainly falls short in terms of hardware and specifications, if one were to ignore its apps. Also, there are no subsidised data plans for handset buyers, but only a promise of the savings they will see after a year or two. Clearly, the iPhone devices don't get to enjoy normal 3G data plans like other devices do.

Finally, the decision lies with the end consumer whether it is worth buying an upgraded phone that looks almost like iPhone 4, has battery issues, software issues but offers 1080p HD video recording.

Baca Selengkapnya ....

How To: Install OS X Lion on your ordinary PC

Posted by Unknown Rabu, 23 November 2011 0 komentar

 Today, it’s possible to take a small chunk of that Apple experience and use it on your own, outside the confines of the expensive ecosystem built specifically for it. The enjoyment won’t be the same, but the whole point is to expand users’ options and give them the choice. We’re referring, of course, to running Mac OS X on any ordinary PC, something that the Cupertino giant does not like, endorse or acknowledge in any way. Apple’s desktop OS is finely tuned to work with its own hardware, software and online services: an entire ecosystem.

Mac OS X has a lot of appeal: the graphics are rich, security is higher than Windows, it’s generally easier for beginners to get used to, and there’s some excellent software available for creative professionals. For most people though, just the “coolness” factor and thrill of getting it working without spending money on Apple hardware are reason enough to try. This is the “reality distortion field” effect that dozens of other companies have tried to emulate over the years, to varying degrees of success.

This has the disadvantage of limiting your choices (and budget range) when it comes to buying a new computer, but it has the advantage of eliminating the thousands of variables that tend to make Windows machines slow or unstable.

Apple has never expressly allowed other brands to sell machines with OS X preinstalled, so you’ll never find a Mac bogged down with “bloatware” added on by third-party manufacturers, and you won’t have to go hunting for a printer driver when you need one, because it’s already built in.

Be warned - Running OS X is a tricky proposition and it’s not endorsed by Apple in any way. You’ll be contravening their end-user license agreement and will not have access to any help or support from them. You also won’t have a Mac-specific keyboard, mouse or trackpad, which will make several shortcuts and gestures impossible to use. This process is not recommended for casual users, or anyone who isn’t familiar with the internal workings of a PC. You run the risk of erasing your hard drive and losing whatever’s on it, so make sure you have backups. Moreover, obtaining a legal copy of Lion, the latest version of OS X, is entirely your responsibility.

what u need

installing an operating system on hardware not originally designed for it is a tricky process. Apple is famous for building experiences around tightly integrated hardware and software, so problems are bound to crop up when trying to run OS X on unfamiliar components. It's not impossible to run OS X on commodity PC hardware, but this isn't a project to undertake if you're not 100 percent comfortable with your computer's inner workings. As of now, OS X Lion is a bit more difficult to get running than previous versions, Leopard and Snow Leopard. With Lion only recently released, the driver database is understandably small, and it's quite likely that you'll run into compatibility issues and other odd problems. The most frustrating issue we faced was with an incompatible USB keyboard, which caused all sorts of input errors!

Before beginning any experiment, we must emphasize the importance of backing up everything on your computer. Make a list of all hardware and drivers and search online for known problems. Then, if you're sure you understand all the risks and liabilities, you're ready to proceed.

STEP 1
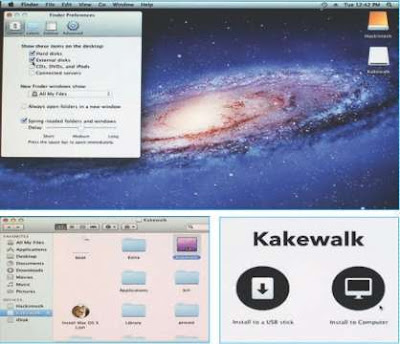
Copy the Lion installation file (InstallESD.dmg) and Kakewalk to the desktop of the Macintosh. Run the Kakewalk utility, and on the main screen, click on ‘Install to a USB stick’.
 STEP 2
On the next screen, select the location of the Lion DMG file and choose the USB stick as the destination. Make sure you choose the correct destination (the USB stick), or you'll end up installing it to the Mac you're working on. When you're sure, click the ‘Create’ button.
 STEP 3
The Kakewalk utility will do the necessary work in the background. It involves formatting the USB stick, mounting the Lion DMG image, copying the installer files and packages to the USB stick and a lot more. All this is done in the background and may take a while depending on the speed of the pen drive. Your USB stick will also be renamed to ‘Kakewalk’.
STEP 4
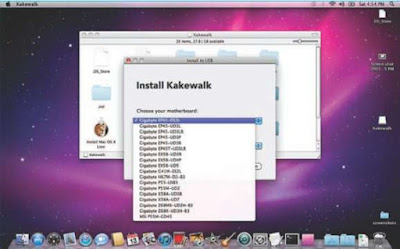
After the process is complete, the utility will ask you to start the Kakewalk installation. Click OK to continue and the next screen will ask you to choose your motherboard model number. The exact version is preferable, but a close variant will also do. Make sure you have an Internet connection as Kakewalk will need to download the necessary drivers from its repository. If your motherboard is not listed, you'll have to choose the closest match. Then carefully select your destination as the USB drive (now renamed as Kakewalk). Click on ‘Start Installation’. After completion, you can safely eject the USB stick and return the Macintosh to its owner, unscathed.
STEP 5
Now plug the USB stick into your PC and turn it on. Go to the BIOS where a few changes need to be made. Change the boot priority to USB HDD. Next, make sure you make the following changes if you have the options in your BIOS: HPET: Enable (64-bit), ACPI Suspend type: S3 (STR) and Hard drive: AHCI enabled. Save and close the BIOS settings. Restart the PC and boot from the USB stick.
 STEP 6
When you boot from the USB stick, you will be greeted by Kakewalk's EFIbootloader. Select the USB stick (Kakewalk) on your screen and press [Enter].
Warning: The target hard drive will be reformatted and all data on it will be lost. If possible, install Lion on a new, blank hard drive.
STEP 7
After a long process during which you'll see lines of text characters scrolling continuously, you will land at the Lion installation screen. If you have not reached here, it's possible that a compatibility issue has been discovered. Note the error lines displayed on screen and search the Internet for a specific solution. You should find specific help on the various forums dedicated to OS X fans. For example, the error ‘DSMOS has arrived’ means that the video card is not compatible.
STEP 8
Follow the steps shown on screen till you arrive at the screen which asks you to choose the destination disk to install the OS to. At this screen, click on ‘Utilities’ and then ‘Disk Utility’. This will start the partition manager for Mac OS X.


STEP 9
Using Disk Utility, click on your target hard drive in the left pane and then click on ‘Partition’ on the right pane. From the Volume Scheme, select ‘1 Partition’ and in the ‘Options’ below, select ‘GUID Partition Table’. Then in the Volume Information, type a name for the partition, select the format type as ‘Mac OS Extended (Journaled) and leave the rest untouched. Finally, click on ‘Apply’ and proceed to format the drive. Once done, exit Disk Utility and proceed with the installation of the OS. The installation will take around 30 minutes, at the end of which your computer will reboot. Leave the USB stick plugged in, as there is no bootloader yet.
Step 9 
STEP 10
This time, when the system boots again, choose to boot from the hard drive instead of the USB stick. Once booted, you should be welcomed to the next steps of the installation. Continue with all the necessary details that are asked on the screen.
STEP 11
Once done, you should arrive at the default Lion desktop. Congratulations, your installation has been successful! But you have still got to install the bootloader to your hard drive so that it can boot up on its own.
STEP 12
Locate your USB stick in the OS X Finder and open it. You will find the application ‘Kakewalk’—double-click and run the utility. Click on the icon that reads ‘Install to Computer’.

STEP 13
This screen will highlight the motherboard model you chose while making the USB stick on the Macintosh. You cannot change anything here, so simply click on ‘Start Installation’. After a few minutes, you will be asked to reboot the machine. Now your bootloader is installed on your system and you can safely boot your PC from the hard drive. Mac OS X Lion is ready to go!
STEP 14
Installing drivers is the biggest headache, but you can do it in a few steps. First, using MultiBeast, you can install basic drivers for audio, network, graphics, and system components. Copy the Multibeast utility to your new desktop and run it. Follow the steps till you reach the ‘Installation Type’ screen. From the drop down list, carefully choose the drivers of your motherboard and graphics card by referring to their respective user manuals. If you are not sure of any of the drivers, simply don’t select it, or else you will cause errors known as Kernel panic, and might need to reinstall Lion all over again. When the process is complete, you'll need to reboot the PC.
 STEP 15
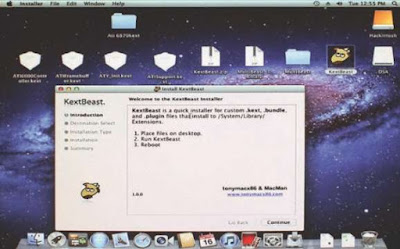
Additional drivers that are not available through Multibeast can be downloaded and installed separately using the KextBeast utility. The drivers are usually in the form of .KEXT files and need to be inserted into certain folders and their permissions set to a particular level. KextBeast does it for you automatically. All you need to do is copy the KEXT files and the KextBeast utility to the desktop and run the utility. It will automatically search for the drivers on the desktop and install them
 your done!.

Baca Selengkapnya ....

Repair Your Windows Operating System Online With Reimage

Posted by Unknown Sabtu, 19 November 2011 0 komentar

Most Windows XP users will notice their system seems to get slower and slower compared to when they first installed the operating system. As the time passes, we installed a lot of programs and stored a lot of files, causing the operating system used more system resources and makes your computer slower. Besides that, with the emergence of internet and file sharing, users can unknowingly install what is known as spyware or malware. These malwares, spywares and viruses damaging your operating system and degrading its health.

What is Reimage?

Reimage is a web-based service runs via ActiveX that repairs damaged Windows XP systems so that your operating system will run like it first installed. Reimage repairs Windows XP PCs remotely over the network or internet and specialized in Windows XP PCs that won’t reboot.

Reimage performs its works by applying a set of predefined actions according to the problem in the XP systems. By referencing with over 4 million registry and components repository, Reimage looking for components or objects that are missing, new objects or changed by viruses, malware or other malicious software. Then, Reimage will replace the missing objects with the repository databases and restore the services or components to its original state. For the new components or objects, Reimage will disable them so they can’t do harm anymore. Unlike built-in Windows XP system restore, Reimage doesn’t affect user data or applications on the operating system.

Here are some features of Reimage:

Reduce repair time – Save time because Reimage is easy to use and there is no need to call your technician each time you have PC problems.
Optimize your Windows XP machine – Reimage will provide diagnosis for your PC, including processor usage, memory usage, hard disk usage, Windows Paging usage. Then provide you with a set of recommendation for your PC.
Repairs all kind of problems on your Windows XP PC – This is including registry fixes, driver fixes, check for security issues, and disable all kind of malicious programs on your PC.
No installation required – Because Reimage used web-based ActiveX, you can run it anywhere as long as Internet Explorer is installed.
For Reimage Home Edition, it also comes with a Free PC booster which capable to speed up most common programs on your PC. Unfortunately, Reimage only available for Windows XP.

Baca Selengkapnya ....

Software Keyloggers >> SpyAgent

Posted by Unknown 0 komentar
The hardware keyloggers are extremely useful only in case if you have physical access to victim’s computer, but what if you don’t have physical access to victim’s computer and sometimes the victim might notice it.

This is where software keyloggers come into play, Software keyloggers can also be classified into two types:

1. Local Keylogger
2. Remote Keylogger 

local keyloggers


Local Keyloggers are used to monitor local computers (May be your  own Pc), they are very easy to install and are completely undetectable  and it’s really hard to figure out once a keylogger is installed on a  computer because usually keyloggers hide themselves from  taskmanager, Windows Registry etc. Whenever you want to see logs,  screenshots etc you just need to press a hotkey which (ex.  Shift+Ctrl+F10). 

There are hundreds of keyloggers available now days but some of  them are userfriendly and are actually capable to hide themselves  once they are installed, some of the Popular Local Keyloggers are:  

1. Spyagent
2. AllSpy Keylogger
3. Refog keylogger 

SpyAgent 

Spytech agent is an award winning software which can be used to  monitor both local and remote computer but it’s usually good local  monitoring, for remote monitoring there are software better than  SpyAgent with far more features than it. Spytech Spyagent runs in  total stealth mode and once it is installed on victims computer it's  almost impossible to detect it's presence

Spyagent Installation Guide  

 NOTE: After install is complete you can delete this file! 

Step 2 - Click through the installer until you come to this screen.

this is where you choose the folder location for SpyAgent's install. We recommend you change this from the default (c:\program files\spytech software...) to the path below, or something of your own making. Make sure you remember this path to access the software! Once you configure the Destination Directory, click the Next button.


Step 3 - Click through the installer until you come to this screen.

This  is where you choose the install type for SpyAgent. If you want  SpyAgent to not appear in the start menu and install the bare  minimum files then choose the Stealth installation, as shown below.  Click Next when you have done so.


Step 4

When you are done configuring the install you will be asked if you want to include an uninstaller. For total stealth choose NO - as shown.


Step 5

After your install completes you will now have to configure and run SpyAgent! Go to the START button on your desktop and click it once to bring up the Start menu. Choose the RUN... option to get the below window. You will have to enter your installation path (this is the


 same path from the installer that you just entered!) When you have
entered it press OK.

Step 6 (optional)

Once you are in the install directory you will see the SpyAgent files below if you have chosen Stealth install. Now, Highlight the sysdiag.exe file as shown below

Step 7 (optional)

Right click on the sysdiag.exe file and choose RENAME from the menu by clicking on it.


Step 8 (optional)

 You will now be able to type a new name in for sysdiag.exe. As you can see below we chose to name it "snmp.exe". Use the below name, or something of your making to conceal SpyAgent's identity.


Step 9

After renaming you can now run SpyAgent by double clicking the file you renamed! You will be prompted to configure your password - do so. Once inside SpyAgent click on the 'GENERAL' button on the right side of the SpyAgent window. The below window will appear - enable the options exactly as you see in the below
window.

After you configure the General options you can click the LOGGING tab and configure the logging options as well! When you are done click OK to save your options!


Step 10

Almost done! Now all that is left to do is click the Start Monitoring button that is highlighted below! You will be prompted for your password - enter it, and click OK. You will receive a notification message on how to bring SpyAgent out of stealth mode to later view logs - read this message carefully!

Now SpyAgent is in total stealth. When you restart your PC it will run  invisibly as well. To stop stealth mode run the nostealth.exe in the  SpyAgent installation directory, or press CONTROL+SHIFT+ALT+M
on your keyboard to bring up the password window!


Baca Selengkapnya ....
Trik SEO Terbaru support Online Shop Baju Wanita - Original design by Bamz | Copyright of apk xda.